
The Power of Jekyll
From dynamic content to a static website
I'm a stubborn guy. I always go down the hard way, trying to reinvent the wheel. This includes plenty of systems and web projects over the years. In the beginning of 2013, I felt a bit lazy, so I used Wordpress for my blog — it’s easy to use and you don’t have much trouble with it, eh? The problem is that you will mostly have features you don’t need, but some that you definitely need are missing. So I was right to develop my projects without any popular system.
Now, I had two major problems:
- Building an own system requires way too much time for only my private projects, because they are not that big.
- Using common systems like Wordpress are... We don’t need to talk about it at all. Overall it’s good but as a developer you feel caged because of the aforementioned “feature problem”.
My good friend Kevin told me about the magical power of Jekyll. When I first checked the website, I wasn’t very impressed, because I really like external databases like MySQL. Jekyll, instead, was proclaiming:
No more databases, comment moderation, or pesky updates to install — just your content.
Nonetheless, I thought it would be a good idea to test it. Just in case it would turn out to be as good as Kevin told me. It’s really quick and easy to install, the only requirement is to have Ruby already installed.
gem install jekyll
Alright, let’s start a new blog:
jekyll new my-awesome-blog
cd my-awesome-blog
Jekyll creates a new folder with your project name and generates a clear structure in it:
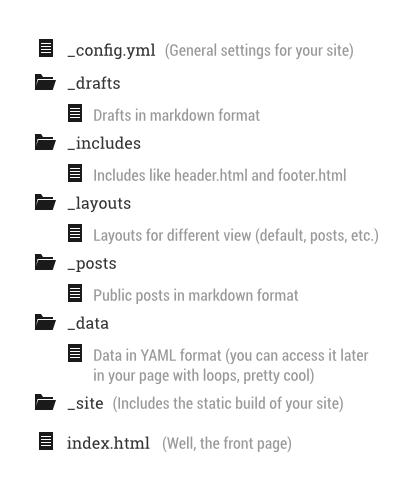
Even if you have never worked with such a kind of system, it’s easy to follow this folder-structure. It connects HTML, YAML, Liquid, and Markdown.
- HTML to build the structure of your website
- YAML & Liquid to work with dynamic content
- Markdown to write your posts/articles
Open the project folder with your favorite editor, which is of course Sublime Text. Before you start to change anything, go back to your terminal and type $ jekyll serve or $ jekyll serve —watch to build the site. Open your browser and go to http://localhost:4000, and voilà. You can now see your new website running on Jekyll with sample posts.
To customize your layout (or anything else), go back to your editor. You’ll probably find out yourself what to do, but I’m going to publish another article about ”building own templates” for Jekyll. Until then, try to find out how it works. I’m sure you don’t even want to know anymore when the follow-up is published once you've started your own layout.
For help, you may want to refer to the Jekyll website: http://jekyllrb.com.